This is the second part of a series concerning custom group ordering in a grouped SharePoint List.
While the first part dealt with a hard coded group order (as the group positions were defined in a separate list), this part shows how the groups can be dynamically ordered by the number of child elements they contain.
This article deals with the more complex case of nested groupings (two grouping categories). If the list contains only one column to group by and you want to implement custom group ordering on those groups, please see this link.
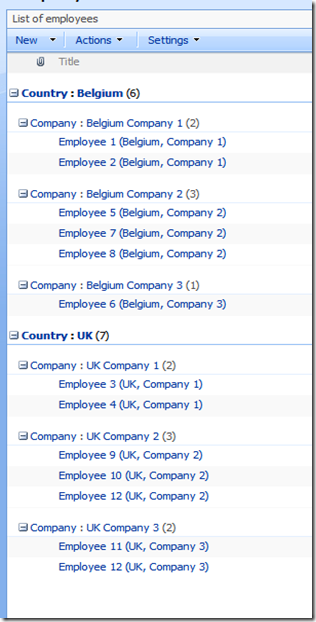
We will use a simple list with Employees, grouped by Country and then by Company.
As it can be seen, next to each group name the list of child list rows is displayed (not child groups, an important notice).
What we want to achieve is to order all the groups (first level and second level) based on the number of child list rows they nest.
-
Convert the list to an XSLT Data View
Open your list (or the page containing the list) in SharePoint Designer, right click on the list and choose "Convert to XSLT Data View".
The first thing you will notice after having converted the list to an XSLT Data View is that the number of child list rows contained by each group is no longer displayed. We will manually change the XSL later to display them again.
-
Remove the default sorting by ID ascending, and add grouping by Country and Company

Now you need to add the new grouping and sorting criteria, by adding the "Country" and "Company" columns to the Sort list.
Make sure you check the "Show group header" checkbox for both columns, otherwise the groupings will not appear, and you will only achieve a nested sort.
Press OK to close this window.
-
Alter the generated XSL to implement the custom ordering
Go to the code view of the page and search for the definition of the template called "dvt_1.body" and take a look at the second <xsl:for-each> iteration through $Rows elements (the first one is used to create the $dvt_Rows variable). Just below the <xsl:f0r-each> element, append two more lines, making the code look like this:
<xsl:for-each select="$Rows">
<xsl:sort select="count(//Row[@Country=current()/@Country])" order="descending" data-type="number" />
<xsl:sort select="count(//Row[@Company=current()/@Company])" order="descending" data-type="number" />
... and that's it. These two lines will sort the order in which the lines are displayed (and therefore, catalogued into groups) first by the number of identical Countries contained by other rows in relationship with the current iterator value, and then by Companies.
-
Display the number of child list rows contained by each group
By default, after creating the XSLT Data View from a multi-grouped list, SharePoint creates individual templates for each group section. Even if they appear to be identical, this is a smart thing to do because it allows individual customization for each group. For us, in this example, it means we have to change both templates to have the number of child list rows displayed.

From the design pane, click on the value of a group name, as seen above. Now, in the code view, the corresponding part responsible for displaying that field is automatically highlighted. You should have highlighted a part of the following line:
<xsl:otherwise><xsl:value-of select="$fieldvalue"></xsl:value-of></xsl:otherwise>
which will need to be modified to look like this:
<xsl:otherwise><xsl:value-of select="$fieldvalue"></xsl:value-of> (<xsl:value-of select="count($nodeset)" /></xsl:otherwise>
Please note that the $nodeset variable contains the XML sub-tree of child list rows nested by the current group iteration the template is applied for.
Similarly, you need to change the template for the top-level group, by clicking on the "UK" value in the example above and changing the same line with the same value.
Finally, the result looks like this:

As you can see, all the groups are ordered by number of child elements, descending.
The careful reader may notice that there is a slight difference between the sample result above and your result: the secondary groups are not as indented as they should be: that's because the indentation was lost in (the XSL) translation. To have the list displayed nicely, go to design view and click on the "Company" value (sample picture used for example), and you should have the corresponding XSL bit highlighted in code view. Two lines above that, you will find this line:
<a href="javascript:" onclick="javascript:ExpGroupBy(this);return false;"><img src="{$imagesrc}" border="0" alt="{$alttext}" name="{$altname}" /></a>
which needs to have an   appended in front of it, thus becoming
  <a href="javascript:" onclick="javascript:ExpGroupBy(this);return false;"><img src="{$imagesrc}" border="0" alt="{$alttext}" name="{$altname}" /></a>
  is the hex representation of the tab character.
...and you're done, congratulations! :)

