The problem
Suppose you have a standard SharePoint list with its items grouped by a field. By default, the SharePoint interface allows you to show the groups in ascending or descending order, and the ordering is done based on the group's name.
What do you do if you want to control the order in which the groups are shown? You may want to draw attention to a certain group and put it at the top, without changing its name or the grouping criteria, or move one down to the end of the list, and you want to do that from the user interface, without any 3rd party installations.
The solution
The idea is to have a secondary list containing your group names, while the primary list contains a look-up field pointing at the secondary list's elements. The secondary list, which we will call "Lookup list", contains an extra column called GroupIndex with the index positions each group will have in the final render. We will then use SharePoint Designer to change our grouped view into a XSLT view, use the two joined tables as a linked data source, and implement a custom Sort Expression to use the GroupIndex column for the final render.
Consider the classical example of Products and Product Categories, using sample data as depicted below:

The Product Categories list. Note the GroupIndex column to the right contains the positions each group will have in the final display.

The Products list
I have created a view which groups the items by category. As you can see the category groups are sorted ascending, which is really what we want to change.
- Convert the view to XSLT Data view
Open your site in SharePoint Designer. Navigate to the ProductsList, and then to the GroupedByCategory view. Right click on the list and choose "Convert to XSLT Data view".

- Create the linked source
Make sure the Task Pane "Data Source Library" is selected from the main Task Pane menu.
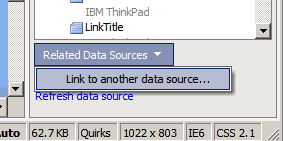
Right click on your XSLT Data view and select the last option "Data View Properties". This will automatically display the Data Source Details Pane containing the current source for your Data View. Click on the "Related Data Sources" button and choose the only available option in order to change the Data Source:
Say "OK" to the warning dialogue. This view will be used just for information, while CRUD functionality can be employed elsewhere.
The ProductsList already exists as a data source, we need to link it with the look-up list. In order to do this, add the ProductCategoriesList to the SelectedDataSources control and click Next.

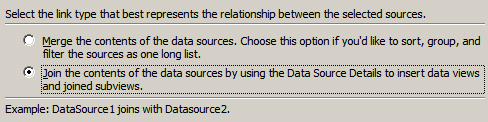
In the next window, select "Join the contents …": this will allow us to specify the field used to join the two tables and establish the relation between them. You can also give it a name (in the General tab), for example "ProductsDataSource":
- Apply the Custom Sort Expression
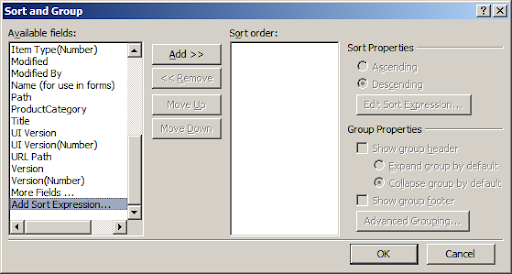
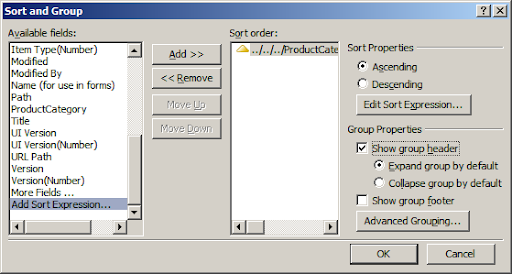
Choose "Add Sort Expression" from the list of Available feeds and click "Add". In the next window, scroll all the way to the bottom, expand the Rows/Row tree nodes inside the ProductCategoriesList node, and drag the GroupIndex column to the Xpath Expression control. You should see something like this:
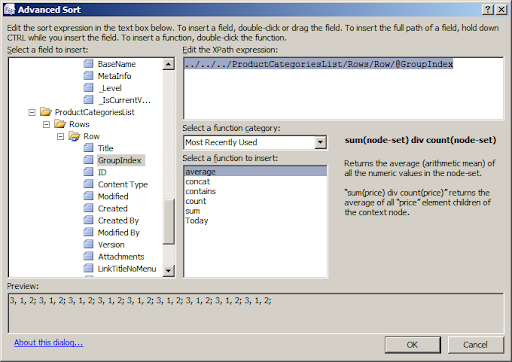
Now we finally get to change the sort expression:
Instead of
../../../ProductCategoriesList/Rows/Row/@GroupIndex
we edit it to
../../../ProductCategoriesList/Rows/Row[@Title=current()/@ProductCategory]/@GroupIndex
We will see later the purpose of this line and how it is applied. For now, let's finish with the custom sort order. Click OK and you will return to the previous window. Make sure you check the "Show group header" checkbox under Group Properties (see picture below), otherwise your group header will not be rendered:
Click OK and now your Data View will be rendered again using the new sorting criteria.
So much work and there's already a first problem: our group names have vanished! Instead, we now see the GroupIndex values. This is perfectly correct because the default XSLT uses for display the attribute used for sorting, and we need change this: back into SharePoint Designer, click on Split view mode to see the code behind the page. Now click on the first grouping header ("1" in our case) to see the corresponding part in the XSLT:

As you can see, the transormation displays the value of the $fieldvalue parameter, which will need to have a new value according to our needs. If we scroll up a little bit, we can see the name of the template that generates the group headers. In this case, it is defined like this:
<xsl:template name ="dvt_1.groupheader0">
We now need to search for the place where the template is called. The call looks like this:
<xsl:call-template name ="dvt_1.groupheader0">
<xsl:with-param name ="fieldtitle">
<xsl:with-param name="fieldname">../../../ProductCategoriesList/Rows/Row[@Title=current()/@ProductCategory]/@GroupIndex>
<xsl:with-param name="fieldvalue" select="$groupheader0" />
The value for the $fieldvalue parameter is $groupheader0, which was previously initialised with the exact value of our custom sort criteria. We simply need to change
<xsl:with-param name="fieldvalue" select="$groupheader0" />
to
<xsl:with-param name="fieldvalue" select="@ProductCategory" />
... and our job is finished. Now, the list looks like this:
The groups are sorted in ascending order based on the group's GroupIndex column, defined in the ProductCategories list.
Behind the scenes
So what does really happen when we change the custom sort expression? If you are curious enough to look inside the generated XSLT, you will see that our modified line ../../../ProductCategoriesList/Rows/Row[@Title=current()/@ProductCategory]/@GroupIndex is used, among other places, as an argument to the <xsl:sort/> when iterating through $Rows. In plain English, the sort expression above would translate to: "For each of the Rows to be displayed (which are Products), order and group them by the value of the GroupIndex attribute for the Row inside the ProductCategories list that has the Title equal to the current Product's ProductCategory." ; Note that the current() XSL function is needed because the <xsl:sort/> call is placed inside a <xsl:foreach/> element.
Conclusion
Hopefully you have taken a glimpse at just how much you can customize a view using SharePoint Designer. Should you take a further look inside the default XSLT template, you may find new layers of customization, some of which will be outlined in future posts on this blog.

